Spring is here, and with it comes the urge to bring some color and life into our spaces. If you’ve ever looked at a plain clay flower pot and thought it could use a little personality, you’re not alone. I created this post because I want to share some fun and creative ways to transform those everyday pots into vibrant works of art that brighten up any corner of your home or garden.
If you’re someone who loves crafting, gardening, or simply adding a personal touch to your decor, this one’s for you. Whether you’re a seasoned DIY enthusiast or just starting out, you’ll find something here that sparks your creativity. Painting clay pots is an easy and rewarding project that anyone can tackle, and it’s a fantastic way to express your style.
In this post, I pulled together 30 clay flower pot painting ideas that are unique, fun, and perfect for sprucing up your space. You’ll discover a variety of techniques, from simple brush strokes to intricate designs, that can suit any skill level. Plus, you’ll get tips on choosing colors and themes that match your vibe. Get ready to unleash your inner artist and turn those dull pots into eye-catching decor that reflects your personality!
1. Vibrant Ombre Effect

Transform your clay pots into eye-catching pieces with a vibrant ombre effect! Start by picking two to three shades of your favorite color. This technique is all about blending. Imagine painting from the base of the pot up towards the rim, creating a beautiful gradient. Use a sponge or brush to mix the colors seamlessly as you work your way up. This effect can instantly brighten any room, making your plants stand out even more.To achieve the best results, make sure your pots are clean and dry before you begin. Acrylic paint works wonders for durability, ensuring your artwork lasts. After the paint dries, seal it with a clear coat. This will make the colors pop and protect them from the elements.• Choose two to three shades of the same color
• Use a sponge or brush for blending
• Seal with a clear coat for durability
• Experiment with various color schemes for versatility
With this technique, you’ll create stunning pots that bring life to any space.
Vibrant Ombre Effect
Editor’s Choice

Rust-Oleum 249859 Painter’s Touch 2X Ultra Cover Spray Paint, Semi-Gloss…
2. Geometric Patterns

Elevate your clay pots with modern geometric patterns! This trendy style uses painter’s tape to create sharp, clean lines and striking shapes. Think about using contrasting colors to make your design pop. Start by taping off sections of your pot, then paint each area a different color. Once the paint dries, carefully remove the tape to unveil your unique design. It’s a fun way to add a contemporary flair to your decor.To make it budget-friendly, consider using leftover paint from previous projects. Mix metallic paints with matte finishes for a chic touch. Don’t hesitate to explore different angles and shapes to unleash your creativity. Using stencils can also help achieve intricate designs, perfect for adding some sophistication.• Use painter’s tape for clean lines
• Mix metallic and matte paints for depth
• Try stencils for intricate patterns
• Experiment with varied shapes for uniqueness
These geometric patterns will surely become a standout feature in your home.
Geometric Patterns
Editor’s Choice

4 Rolls Premium Painters Tape, Blue Tape, Masking Tape, Paint Tape for M…

Acrylic Paint Set, 24 Colors (2 oz/Bottle) with 12 Art Brushes, Art Supp…

66 Pcs Small Stencils for Crafts Reusable 3 Inch Stencils for Painting o…
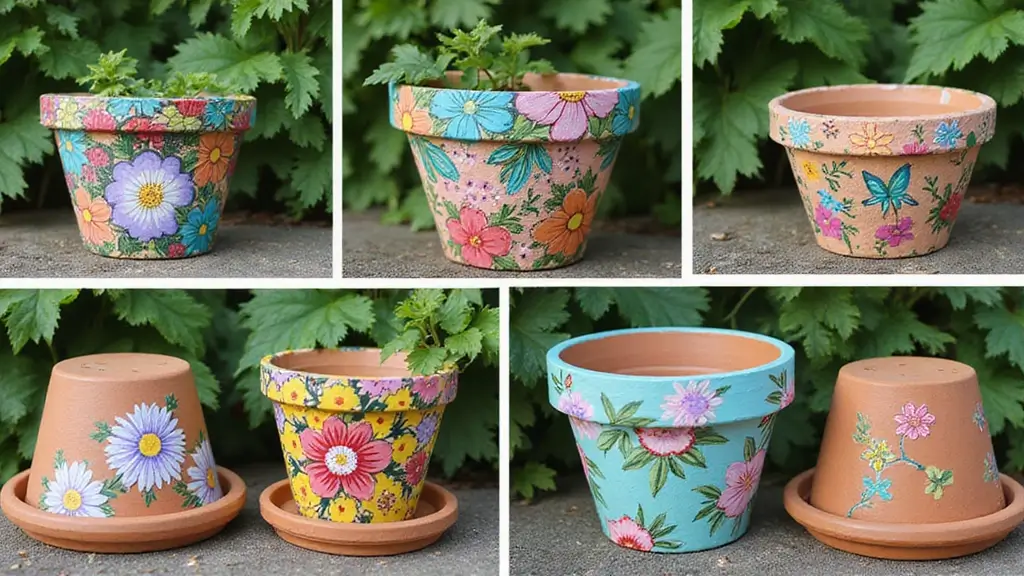
3. Floral Motifs

Floral motifs add a timeless beauty to your flower pots! With a fine brush, you can paint delicate flowers or bold blooms to create an inviting atmosphere. Start with a soft background color, then layer your flowers for added dimension. You can use stencils for precision or let your imagination flow as you paint freehand. Florals not only enhance the look of your pots but also bring a sense of nature indoors.Consider incorporating a variety of flower types to achieve a garden-like effect. Bright colors can create a cheerful vibe, while pastels offer a more soothing look. Adding leaves around your floral designs can further enhance the theme, making your pots harmonious with your indoor plants.• Use a fine brush for detailing
• Layer colors for depth in your flowers
• Try different flower types for variety
• Add leaves to complete the floral look
With these floral motifs, your pots will beautifully blend into your home decor.
Floral Motifs
Editor’s Choice

Anezus Tiny Detail Paint Brushes 30 Pcs Fine Paint Brushes Set with 3 Si…
4. Whimsical Animal Designs

Bring some playfulness to your garden with whimsical animal designs! Choose your favorite animals, like owls or ladybugs, and paint them onto your pots. The fun part? Using acrylic paints ensures that your designs are not only colorful but also durable. You can even add googly eyes for a cute touch! These charming pots can become delightful conversation starters in your garden.Before painting, sketch your design lightly with a pencil. This allows for adjustments along the way. Use bright, vivid colors to make your animals pop against the pot’s surface. Don’t forget to seal your artwork after it dries to protect it from rain and sunlight.• Sketch your design with a pencil first
• Choose vivid colors for a playful look
• Add googly eyes for extra fun
• Seal with a protective coat for longevity
These whimsical animal pots will surely bring joy to your gardening experience.
Whimsical Animal Designs
Editor’s Choice
Acrylic Paint Set, 24 Colors (2 oz/Bottle) with 12 Art Brushes, Art Supp…

DECORA 500 Pieces 6mm -12mm Black Wiggle Googly Eyes with Self-Adhesive …

Mod Podge Spray Acrylic Sealer that is Specifically Formulated to Seal C…
5. Earthy Textures

Bring a touch of the outdoors inside by mimicking natural textures on your clay pots! Use earthy colors like browns, greens, and creams to create a look reminiscent of stone or wood. This rustic technique is all about layering and blending to achieve a natural appearance. Imagine your pots looking like they belong in a serene forest or a sunny garden.Start by applying a base coat of an earthy color, then layer on highlights for depth. You can even add small stones or gravel to enhance the texture further. Sealing your pot will help maintain this natural look and protect it from the environment.• Start with a base coat of earthy color
• Add highlights for depth
• Incorporate small stones for texture
• Seal to protect from weathering
With these earthy textures, your pots will blend seamlessly into any natural setting.
Earthy Textures
Editor’s Choice
Acrylic Paint Set, 24 Colors (2 oz/Bottle) with 12 Art Brushes, Art Supp…
Mod Podge Spray Acrylic Sealer that is Specifically Formulated to Seal C…
6. Recycled Material Accents

Get creative and eco-friendly by incorporating recycled materials into your clay pot designs! You can use items like old fabric, newspapers, or bottle caps as unique accents. For instance, try creating a mosaic effect with broken tiles or colorful paper scraps glued onto the pot. Paint over them for a cohesive look or leave them as they are for an eclectic vibe.Consider using a decoupage technique for a smooth finish. This method allows you to blend different materials easily. Mixing media can create a textured look that’s visually interesting and sustainable. Your garden will not only look beautiful but also reflect your commitment to the environment.• Use old fabric or newspapers for accents
• Create a mosaic effect with scraps
• Try decoupage for a smooth finish
• Combine materials for a unique touch
With recycled elements, you’ll enhance creativity and sustainability in your garden.
Recycled Material Accents
Editor’s Choice

Mod Podge Gloss Sealer, Glue & Finish: All-in-One Craft Solution- Quick …

Apple Barrel Acrylic Paint in Assorted Colors (8 Ounce), 20403 White

Youway Style Iridescent Glass Mosaic Tiles for Crafts Bulk,200g Broken M…
7. Inspirational Quotes

Turn your clay pots into sources of motivation by painting inspirational quotes! Pick a phrase or word that inspires you and carefully paint it around the pot with a fine brush. Choose colors that contrast nicely with the base color to ensure your message stands out. This personal touch adds character and positivity to your gardening space.For precision, consider using a stencil or lightly outlining your quote with a pencil. Sealing your work afterward protects your writing and keeps it looking fresh. You might also experiment with different fonts to give your quotes more personality, making your pots truly one-of-a-kind.• Pick a motivational phrase that resonates
• Use a stencil for precise lettering
• Seal your work for protection
• Experiment with varied fonts for style
With these inspirational quotes, your pots will uplift your spirits and beautify your garden.
Inspirational Quotes
Editor’s Choice

1/3, 1/2, 3/4, 1, 2 Inch Letter Stencils for Painting, 28 Pack Reusable …
Mod Podge Spray Acrylic Sealer that is Specifically Formulated to Seal C…
8. Monochromatic Elegance

Embrace simplicity with monochromatic designs on your clay pots! This approach involves choosing a single color and playing with its various shades and tones. For a sophisticated look, consider using a matte finish for the base and a glossy finish for details. This style is visually striking and can complement any decor.Get started by using lighter shades for highlights and darker shades for shadows. You can create patterns like dots, stripes, or waves to add interest. This monochromatic palette is not only easy to achieve but also provides a modern touch, making it perfect for minimalistic aesthetics.• Choose one color to work with
• Use shades and tones for depth
• Create patterns like dots or stripes
• Pair with simple plants for elegance
With monochromatic elegance, your pots will shine with sophistication.
Monochromatic Elegance
Editor’s Choice

Horizon Group USA Paint Brushes -35 All Purpose Paint Brushes Value Pack…
9. Seasonal Themes

Celebrate the beauty of each season by painting themed pots throughout the year! In spring, think bright florals; for summer, use sunny yellows and tropical designs; autumn calls for rich oranges and browns; and winter can feature snowy scenes or festive motifs. This keeps your decor fresh and exciting.Change your pots with the seasons to maintain variety in your space. Using stencils for seasonal shapes like leaves or snowflakes can help create a polished look. Combining colors that reflect each season’s vibes adds a cheerful touch to your garden.• Paint seasonal designs for each time of year
• Use stencils for seasonal shapes
• Mix colors that match the season’s vibe
• Change designs to keep your decor fresh
Seasonal themes breathe life into your pot collection, allowing you to enjoy changing aesthetics throughout the year.
Seasonal Themes
Editor’s Choice
Acrylic Paint Set, 24 Colors (2 oz/Bottle) with 12 Art Brushes, Art Supp…

2 Pack – 2 Inch Letter Stencils Set, 72 Reusable Stencils for Painting O…

Soucolor Acrylic Paint Brushes Set, 20Pcs Round Pointed Tip Artist Paint…
10. Watercolor Techniques

Create dreamy designs on your clay pots using watercolor painting techniques! Instead of using a traditional brush, try a spray bottle to achieve a soft wash effect. Dilute acrylic paint and spritz it with water for a fluid look that looks artistic and free-spirited. Experiment with layering colors to create unique effects.To master this technique, work on a flat surface to control drips. After painting, be sure to seal your pots to protect your artwork from moisture. Blending different colors can yield a beautiful gradient effect, adding depth to your designs.• Use a spray bottle for a soft wash
• Seal your pots after painting to protect
• Experiment with layering colors for effect
• Work on a flat surface to manage drips
With watercolor techniques, your pots will showcase a stunning artistic flair.
Watercolor Techniques
Editor’s Choice

2 Pack Continuous Spray Bottles – Ultra Fine Mist Sprayer | Water Spray …
Acrylic Paint Set, 24 Colors (2 oz/Bottle) with 12 Art Brushes, Art Supp…

Mod Podge Waterbase Sealer, Glue and Finish for Outdoor (8-Ounce), CS112…
11. Tie-Dye Inspiration

Channel the fun vibes of the 70s with tie-dye inspired clay pot designs! Start with a plain white pot and use colorful fabric dyes or acrylic paints to create swirling patterns. Crumple the pot while applying colors for that authentic tie-dye look. This approach is all about vibrant energy and making a statement in your space.To enhance your designs, use rubber bands to create unique shapes and patterns. Blending colors can give you a more fluid look, while allowing them to dry completely before sealing ensures the colors stay vibrant. Tie-dye pots add a playful pop of color anywhere they are displayed.• Start with a plain white pot
• Use rubber bands for unique shapes
• Blend colors for a fluid effect
• Allow to dry completely before sealing
Tie-dye pots will infuse your space with color and energy.
Tie-Dye Inspiration
Editor’s Choice

XKDOUS 24 Colors Rubber Band Bracelet Kit, Rubberband Bracelet Making Ki…

vensovo 3 Inch White Terra Cotta & Terracotta Pots with Drainage – 20 Pa…
12. Rustic Charm with Distressed Paint

Achieve a charming, vintage look on your pots with distressed paint techniques! Start with a base coat in one color and let it dry completely. Next, apply a contrasting color, then lightly sand some areas to reveal the base color underneath. This creates a rustic, timeworn effect perfect for farmhouse decor.Using chalk paint can enhance the matte finish, giving your pots an authentic vintage feel. Distress areas that would naturally wear over time for a more realistic look. Pairing them with natural elements like jute or twine adds an extra touch of charm.• Start with a base coat in one color
• Use chalk paint for an authentic look
• Distress areas for realism
• Pair with natural accents like jute
With distressed paint, your pots will exude warmth and character.
Rustic Charm with Distressed Paint
Editor’s Choice

Romeda 8-Pack Sanding Sponge, Four Grits Per Pack 60/80/120/220, Washabl…

PerkHomy Natural Jute Twine 600 Feet Long Twine String for Crafts Gift W…
13. Layered Stencils

Get creative with layered stencils to add depth to your pot designs! Choose several stencils that complement each other and use a sponge or brush to apply different colors. Layering creates a unique, multidimensional effect that will make your pots stand out.Start with your base stencil and gradually build up layers. Transparent paints can give a subtle effect, while bold colors will make a statement. After finishing, seal your design to protect those intricate layers from wear and tear.• Choose multiple stencils for layering
• Experiment with transparent paints for subtlety
• Build up layers for dimension
• Seal your work to protect intricate designs
Layered stencils will turn your pots into true works of art.
14. Drip Painting Fun

Let your creativity flow with drip painting techniques! This method involves pouring paint over the top of your pot and letting it drip down the sides for an abstract look. Choose vibrant colors that complement each other for a lively design that catches the eye.To get started, place your pot on a canvas or plastic sheet to catch the drips. Experiment with different pouring techniques to achieve varied effects. Make sure to allow plenty of drying time to prevent smudging and to enhance the overall look.• Pour paint over the top of the pot
• Use a canvas to catch drips
• Experiment with pouring techniques for variety
• Allow ample drying time to prevent smudging
Drip painting creates dynamic art that’s sure to be a focal point.
Drip Painting Fun
Editor’s Choice
Apple Barrel Acrylic Paint in Assorted Colors (8 Ounce), 20403 White

12 x 9 Ft Plastic Drop Cloths (6-Pack) – Disposable Painter’s Sheeting &…

15. Nature-Inspired Textures

Bring the beautiful outdoors to your pots with texture painting! Use materials like leaves, twigs, or fabric to imprint organic designs onto your pots. Press leaves into wet paint to create a stunning patterned effect that resembles nature’s artwork.Try experimenting with different pressing techniques for varied results. Natural colors will reflect the beauty of the outdoors, giving your pots a rustic charm. Don’t forget to seal your designs to keep the textures intact and protected.• Use natural materials for imprinting
• Experiment with different pressing techniques
• Choose earthy colors for authenticity
• Seal to protect textures from wear
Nature-inspired textures will beautifully connect your pots to the garden.
Nature-Inspired Textures
Editor’s Choice
Mod Podge Spray Acrylic Sealer that is Specifically Formulated to Seal C…
16. Minimalist Art

Embrace the beauty of simplicity with minimalist designs on your clay pots! Choose a soft base color and add one or two simple shapes or lines for a clean, elegant look. This approach makes your pots stand out while retaining an air of understated sophistication.You can use painter’s tape to create crisp lines and shapes. Sticking to a monochromatic palette enhances the minimalist feel even more. Pair your pots with sleek plants to highlight their beauty and keep the space looking fresh.• Choose a soft base color for simplicity
• Use painter’s tape for clean lines
• Stick to a monochromatic palette for elegance
• Pair with sleek plants for balance
With minimalist art, your pots will exude a tranquil and modern vibe.
Fun fact: minimalist clay flower pot painting ideas shine with just a soft base color and one clean line—less is more, and your plants do the talking. Use painter’s tape for crisp edges and a monochromatic palette for calm, chic decor.
Minimalist Art
Editor’s Choice

6 Pack 6 Inch Terracotta & Clay Pots with Saucer for Plants, Large Terra…
17. Ethnic Patterns

Celebrate global artistry by incorporating ethnic patterns into your clay pot designs! Look for patterns inspired by cultures you admire, like tribal prints or mandalas. Use vibrant colors and intricate details to bring these designs to life, making your pots truly unique.For execution, thin brushes are great for detailed work. Layer different colors for a more complex look. You might even consider mixing various ethnic styles for an interesting twist that reflects your global appreciation.• Choose patterns from different cultures
• Use thin brushes for detail work
• Layer colors for complexity
• Mix styles for uniqueness
Ethnic patterns will add a rich cultural element to your garden.
Ethnic Patterns
Editor’s Choice
Anezus Tiny Detail Paint Brushes 30 Pcs Fine Paint Brushes Set with 3 Si…
18. Cork and Paint Fusion

Combine corks with paint for a creative pot design that’s full of texture! Glue wine corks onto your pot’s surface and then paint them in bright colors or leave them natural for a rustic touch. This adds dimension and a playful element to your plant displays, making them fun and inviting.You can also use small stones or pebbles instead of corks for a different look. Make sure to seal your finished pot to protect it from moisture. Experiment with different arrangements of corks for a truly unique design.• Glue wine corks onto your pot
• Paint in bright colors or leave natural
• Try small stones for variation
• Seal to protect from moisture
Cork and paint fusion gives your pots a fun yet elegant touch.
Cork and Paint Fusion
Editor’s Choice

Hot Glue Gun Kit with 30 Glue Sticks, Fast Preheating Hot Melt, High Tem…
Mod Podge Spray Acrylic Sealer that is Specifically Formulated to Seal C…
19. Celestial Themes

Bring the magic of the cosmos into your home with celestial-themed pots! Paint stars, moons, and galaxies for a dreamy effect. Start with a dark base color like navy or black, then layer on lighter colors to create celestial bodies. Adding glitter can give your pots a sparkling touch!Use a sponge to create a galaxy effect by blending colors together. Metallic paints for stars and moons can create a shimmering finish that adds to the whimsy. Don’t forget to seal your pot after painting to keep the cosmic beauty intact.• Paint a dark base for depth
• Use a sponge for blending colors
• Incorporate metallic paints for stars
• Seal your pot to keep it protected
Celestial themes will add a whimsical vibe, creating a magical atmosphere in your garden.
Celestial Themes
Editor’s Choice
Mod Podge Spray Acrylic Sealer that is Specifically Formulated to Seal C…
20. Mixed Media Techniques

Dive into the world of mixed media on your clay pots! Combine painting with other materials like fabric, beads, or twine for a unique look. For instance, you can paint a design and then glue on beads to add dimension and interest, allowing for endless creativity.Use a strong adhesive suitable for both clay and the materials you choose for the best results. Balance colors and textures for harmony in your design. Be sure to seal your finished work to protect all elements from wear and weather.• Combine painting with other materials
• Use strong adhesive for durability
• Balance colors and textures for harmony
• Seal your work for protection
Mixed media techniques will make your pots truly express your creativity.
Mixed Media Techniques
Editor’s Choice

B-7000 Super Adhesive Glue, Industrial Strength B7000 Glues Paste for Rh…
Mod Podge Spray Acrylic Sealer that is Specifically Formulated to Seal C…
21. Upcycled Pottery

Give new life to old clay pots through upcycling! Instead of throwing away chipped or faded pots, rejuvenate them with paint and fresh designs. You can layer colors, add patterns, or even use decoupage techniques with old fabric or paper to create something new and beautiful.Before starting, ensure the old pot is clean and free of loose paint. Bright colors can help mask imperfections, making them look fresh again. Sealing your pot afterward will ensure your new design lasts, giving your old pot a second chance at beauty.• Clean the old pot before starting
• Use bright colors to mask flaws
• Layer colors for freshness
• Seal for longevity
Upcycled pottery not only reduces waste but also allows you to express your creativity.
Upcycled Pottery
Editor’s Choice
Acrylic Paint Set, 24 Colors (2 oz/Bottle) with 12 Art Brushes, Art Supp…

Redesign with Prima DECOUPAGE GEL MATTE – 1 JAR, 230ML 655350652425
22. Colorful Doodling

Let your imagination run wild with colorful doodling on your pots! Grab paint pens or brushes and create freehand designs like swirls, dots, or abstract shapes. This casual style is all about spontaneity and can lead to stunning visual interest, making each pot a unique canvas.Choose contrasting colors for better visibility and allow each layer to dry before adding more doodles. Outlining your doodles with a black pen can also help them pop. This fun approach makes your pots a reflection of your personality and creativity.• Use paint pens for easy doodling
• Choose contrasting colors for visibility
• Allow layers to dry between additions
• Outline with black pen for emphasis
Colorful doodling will make your pots a joyful expression of your style.
Colorful Doodling
Editor’s Choice
Acrylic Paint Set, 24 Colors (2 oz/Bottle) with 12 Art Brushes, Art Supp…
23. Whimsical Patterns with Sponges

Create fun and playful designs using a sponge painting technique! Dab a sponge into paint and apply it to your pot for a textured effect. This method is perfect for creating patterns like polka dots, stars, or even floral shapes, bringing a whimsical touch to your gardening decor.Use different sponge shapes to achieve unique designs, and layer colors for added depth. After completing your designs, seal your pots to keep those patterns vibrant and protected from the elements. This technique is both enjoyable and easy, making it suitable for all skill levels.• Use a sponge for textured designs
• Experiment with different shapes for variety
• Layer colors for extra depth
• Seal to keep patterns vivid
Sponge painting is a delightful way to add charm to your flower pots.
Whimsical Patterns with Sponges
Editor’s Choice

NAROA Artist Natural Sea Sponges for Painting 8 Pack | Unbleached Unique…
Acrylic Paint Set, 24 Colors (2 oz/Bottle) with 12 Art Brushes, Art Supp…
Mod Podge Spray Acrylic Sealer that is Specifically Formulated to Seal C…
24. Tie-Back Twine Designs

For a rustic, back-to-nature feel, incorporate twine into your pot designs! Wrap twine around the pots in creative ways, and attach flowers or leaves for added charm. You can also create patterns or knots with the twine to serve as decorative elements, enhancing the natural look of your pots.Before starting, ensure the pot is completely dry. Use a strong adhesive to secure the twine in place, and consider painting the pot underneath for a layered effect. Twine designs add warmth and texture, making your pots inviting and lovely.• Wrap twine around the pots for charm
• Attach flowers or leaves for decoration
• Use a strong adhesive for security
• Paint the pot underneath for layers
Twine designs give your pots a warm and natural look that invites creativity.
Tie-Back Twine Designs
Editor’s Choice
PerkHomy Natural Jute Twine 600 Feet Long Twine String for Crafts Gift W…

Aleene’s Clear Gel Tacky Glue for Crafts, Nontoxic, Applies and Dries Cl…
Acrylic Paint Set, 24 Colors (2 oz/Bottle) with 12 Art Brushes, Art Supp…
25. Unique Brush Strokes

Showcase your artistic flair with unique brush strokes on your pots! Experiment with various brush techniques to create abstract designs or landscapes. Use broad strokes for larger areas and fine brushes for details, turning your pots into canvases of expression.Mixing colors can add interesting gradients to your work. Allow different strokes to dry before adding more for layered effects. Don’t forget to seal your pots for protection to keep your art looking fresh and vibrant for years.• Experiment with brush techniques for uniqueness
• Mix colors for interesting gradients
• Allow strokes to dry before adding more
• Seal for protection of your art
Unique brush strokes will give your pots a personalized touch, showcasing your artistic vision.
Unique Brush Strokes
Editor’s Choice
Acrylic Paint Set, 24 Colors (2 oz/Bottle) with 12 Art Brushes, Art Supp…

Paint Brushes Set of 24 Pieces Wooden Handles Brushes with Canvas Brush …
Mod Podge Spray Acrylic Sealer that is Specifically Formulated to Seal C…
26. Playful Polka Dots

Polka dots are a timeless design choice that adds a playful twist to your flower pots! Choose your favorite colors and use a brush or dotting tool to create dots of varying sizes. You can alternate colors for a lively effect or stick to a single color for a classic look that never goes out of style.To ensure precision, use a pencil to lightly mark where the dots will go before painting. A sealant will help keep your designs vibrant and long-lasting. Pair polka dots with solid colors to create balance and visual interest in your gardening space.• Use a brush or dotting tool for dots
• Mark positions with a pencil for precision
• Seal for long-lasting results
• Pair with solid colors for balance
With playful polka dots, your pots will bring cheer and charm to any setting.
Playful Polka Dots
Editor’s Choice

10Pcs Dotting Tools, Ball End Dot Art Tools for Rock Painting, Pottery C…

Mod Podge, Perfect for Indoor and Outdoor Craft Projects Clay Pot Sealer…
27. Natural Leaves Imprint

Create stunning designs on your pots by imprinting leaves! Select leaves like ferns or large palm leaves and press them onto wet paint for an organic look. Once dry, you can paint over the imprints or leave them as is to celebrate nature’s beauty.Experiment with different types of leaves to achieve varied patterns and textures. Using contrasting colors can highlight the imprints, making them stand out beautifully. Don’t forget to seal your pot to preserve the design and keep it looking fresh.• Press leaves into wet paint for imprints
• Experiment with different leaves for variety
• Use contrasting colors to highlight
• Seal to preserve designs
Natural leaf imprints will connect your pots to the beauty of the outdoors.
Leaf imprints turn everyday clay flower pot painting ideas into nature-inspired art you can customize in minutes. Press ferns or palm leaves onto wet paint, then either highlight the texture with contrasting colors or seal it for lasting charm. It’s eco-friendly, practical, and totally shareable.
Natural Leaves Imprint
Editor’s Choice
Mod Podge Spray Acrylic Sealer that is Specifically Formulated to Seal C…
28. Artistic Splatter Painting

Get messy and creative with splatter painting techniques! Using a brush, flick paint onto your pots for a fun and spontaneous design. Choose vibrant colors for a striking contrast or stick to a monochromatic palette for a more elegant touch. This style is all about embracing creativity and letting your pots reflect your personality.Work outside to contain the mess and allow for easy cleanup. Let each layer dry before adding more splatters for depth and interest. Sealing your finished design will protect it from wear and keep the colors bright.• Flick paint onto your pots for splatter effect
• Work outside to manage the mess
• Let layers dry before adding more splatters
• Seal to protect finished design
Artistic splatter painting will result in unique pots full of personality.
Artistic Splatter Painting
Editor’s Choice


DecoArt DS17-9 Dads17-9 Multi Purpose Acrylic Primer & Sealer 8 Oz
29. Mosaic Tile Design

Transform your clay pots into stunning mosaics! Cover the surface of your pot with small pieces of colored tiles, glass, or even broken pottery to create a captivating design. Once the mosaic is set, fill in gaps with grout or paint to enhance the pattern and add depth.Start by ensuring your pot is clean and dry before applying tiles. Use a strong adhesive for the tiles to ensure they stay in place. Sealing your mosaic will help it withstand the elements and keep it looking beautiful for years.• Cover pots with colored tiles for a mosaic
• Use a strong adhesive to secure tiles
• Fill gaps with grout or paint for depth
• Seal your mosaic for durability
Mosaic tile designs will add charm and color to your garden.
Mosaic Tile Design
Editor’s Choice
Youway Style Iridescent Glass Mosaic Tiles for Crafts Bulk,200g Broken M…
B-7000 Super Adhesive Glue, Industrial Strength B7000 Glues Paste for Rh…

Mosaic Crystal Grout, Mosaics Tile Tools, Mosaic Tile Accessories – Esse…
30. Fairy Tale Dreams

Let your imagination soar with fairy tale-inspired designs for your pots! Paint whimsical scenes like castles, unicorns, or enchanted forests. Use bright colors and enchanting details to bring your fantasy to life, adding a magical touch to your garden.Start by lightly sketching your designs with a pencil for guidance. Layer colors for depth and interest, and don’t forget to seal your artwork once it’s dry to keep the magic intact. These whimsical pots will inspire creativity and wonder in anyone who sees them.• Paint whimsical scenes like castles or unicorns
• Lightly sketch designs with a pencil first
• Layer colors for depth and interest
• Seal to keep the magic intact
Fairy tale dreams will add a touch of fantasy to your garden, reminding everyone of the joy of creativity.
Fun fact: 72% of DIY lovers say fairy-tale clay flower pot painting ideas boost daily creativity. Start with a light pencil sketch, then layer colors in 2–3 builds for depth, and seal when dry to keep the magic lasting!
Fairy Tale Dreams
Editor’s Choice
Acrylic Paint Set, 24 Colors (2 oz/Bottle) with 12 Art Brushes, Art Supp…
Soucolor Acrylic Paint Brushes Set, 20Pcs Round Pointed Tip Artist Paint…
Mod Podge Spray Acrylic Sealer that is Specifically Formulated to Seal C…
Conclusion

These 30 clay flower pot painting ideas offer exciting ways to express your creativity and enhance your home or garden.
From whimsical animal designs to elegant monochromatic styles, there’s something for everyone. Remember, each design you create reflects your unique personality. Dive into the world of DIY crafts and let your artistic spirit shine!
Note: We aim to provide accurate product links, but some may occasionally expire or become unavailable. If this happens, please search directly on Amazon for the product or a suitable alternative.
This post contains Amazon affiliate links, meaning we may earn a small commission if you purchase through our links, at no extra cost to you.
Frequently Asked Questions
What are some popular clay flower pot painting ideas for beginners?
If you’re just starting out with clay flower pot painting, you might want to try simple designs like polka dots or stripes. You can use bright colors to make your pots pop!
Another beginner-friendly idea is to use stencils to create patterns or images. This way, you can easily achieve a beautiful design without feeling overwhelmed. Don’t forget to seal your painted pots to ensure they last!
What materials do I need for DIY clay flower pot painting projects?
To embark on your DIY clay flower pot painting projects, you’ll need a few basic materials. Gather some acrylic paint, which is perfect for covering clay pots. You’ll also need paintbrushes of various sizes, a palette for mixing colors, and a sealant to protect your artwork.
Optional items include sponges for texture, stencils for designs, and painter’s tape for clean lines. Get creative and have fun with your artistic flower pot ideas!
How can I make my painted flower pots more eco-friendly?
To make your painted flower pots more eco-friendly, consider using non-toxic acrylic paints and natural sealants. You can also repurpose old pots instead of buying new ones, which is a great way to reduce waste.
Another idea is to incorporate natural elements into your designs, such as using plant-based dyes or adding biodegradable decorations. By being mindful of your materials, you can enjoy creative pottery painting while being kind to the environment!
What are some advanced flower pot painting techniques for creative decor?
If you’re looking to elevate your clay flower pot painting skills, try techniques like decoupage or sponging for unique textures. You can also experiment with ombre effects by blending colors from light to dark.
Using a paint sprayer can give a smooth finish and allow for more intricate designs. Don’t shy away from mixing mediums, like incorporating glitter or metallic paints, for a dazzling decorative touch!
Where can I find inspiration for my artistic flower pot ideas?
Inspiration for your artistic flower pot ideas can come from various sources! Check out platforms like Pinterest or Instagram for a plethora of creative designs. Local craft stores often host workshops, which can spark new ideas and techniques.
Don’t forget nature itself! Observe flowers, plants, and natural patterns around you, and let them inspire your next DIY plant pot designs. The possibilities are endless when you tap into your creativity!
Related Topics
clay flower pots
DIY crafts
eco-friendly decor
creative pottery painting
flower pot techniques
artistic designs
beginner friendly
quick projects
seasonal crafts
vintage style
colorful pots
outdoor decor